View 20 Post Bariatric Weight Loss Surgery Photos
-
Body Procedures
- Banana Roll
- Combination Procedures & Body Sculpting
- Knob Knee
- Liposuction
- Muffin Bottom
- Muffin Top
- Panniculectomy
- Post Bariatric Weight Loss Surgery
- Saddlebag / Thigh
- Tummy Tuck
Breast Procedures
- African American Breast Implants
- Bra Buldge
- Breast Asymmetry
- Breast Augmentation
- Breast Implant Revision
- Breast Lift
- Breast Reduction
- Implant Removal
- Nipple Reduction
- Pectus Carinatum Breast
- Pectus Excavatum Breast
- Silicone Gel Implants
- Tubular Breast Deformity
Procedures for Men
- Back To Galleries
![Post Bariatric Weight Loss Surgery Patient Before & After Photo 1](https://www.drlinder.com/wp-content/uploads/2016/11/15452.jpeg)
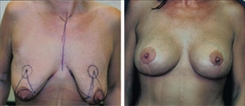
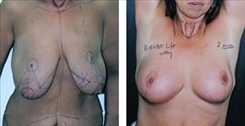
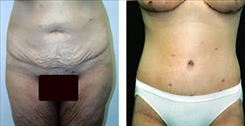
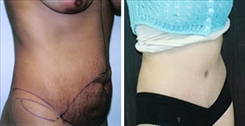
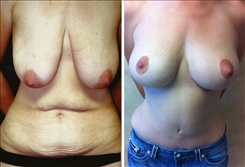
Post Bariatric Weight Loss Patient 01A
![Post Bariatric Weight Loss Surgery Patient Before & After Photo 1](https://www.drlinder.com/wp-content/uploads/2016/12/post-weight-loss-patient-01b.jpeg)
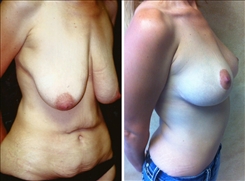
Post Bariatric Weight Loss Patient 01B
![Post Bariatric Weight Loss Surgery Patient Before & After Photo 1](https://www.drlinder.com/wp-content/uploads/2016/12/post-weight-loss-patient-02.jpeg)
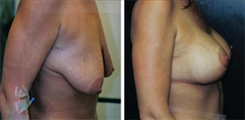
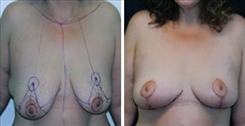
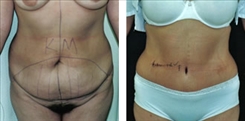
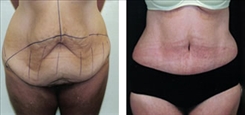
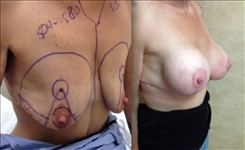
Post Bariatric Weight Loss Patient 02
![Post Bariatric Weight Loss Surgery Patient Before & After Photo 1](https://www.drlinder.com/wp-content/uploads/2016/12/post-weight-loss-patient-03.jpeg)
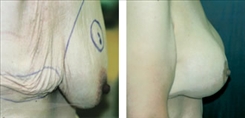
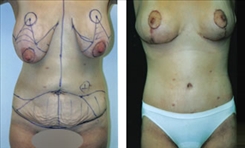
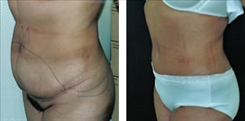
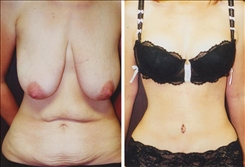
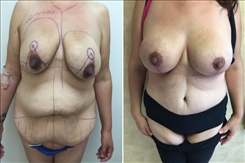
Post Bariatric Weight Loss Patient 03
![Post Bariatric Weight Loss Surgery Patient Before & After Photo 1](https://www.drlinder.com/wp-content/uploads/2016/12/post-weight-loss-patient-04.jpeg)
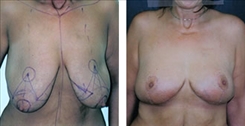
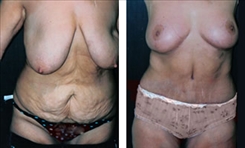
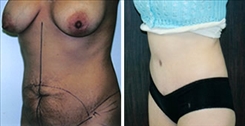
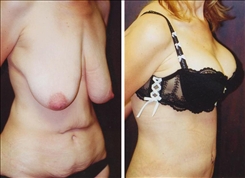
Post Bariatric Weight Loss Patient 04
![Post Bariatric Weight Loss Surgery Patient Before & After Photo 1](https://www.drlinder.com/wp-content/uploads/2016/12/post-weight-loss-patient-05.jpeg)
Post Bariatric Weight Loss Patient 05
![Post Bariatric Weight Loss Surgery Patient Before & After Photo 1](https://www.drlinder.com/wp-content/uploads/2016/12/post-weight-loss-patient-06.jpeg)
Post Bariatric Weight Loss Patient 06
![Post Bariatric Weight Loss Surgery Patient Before & After Photo 1](https://www.drlinder.com/wp-content/uploads/2016/12/post-weight-loss-patient-07.jpeg)
Post Bariatric Weight Loss Patient 07
![Post Bariatric Weight Loss Surgery Patient Before & After Photo 1](https://www.drlinder.com/wp-content/uploads/2016/12/post-weight-loss-patient-08.jpeg)
Post Bariatric Weight Loss Patient 08
![Post Bariatric Weight Loss Surgery Patient Before & After Photo 1](https://www.drlinder.com/wp-content/uploads/2016/12/post-weight-loss-patient-09a.jpeg)
Post Bariatric Weight Loss Patient 09A
![Post Bariatric Weight Loss Surgery Patient Before & After Photo 1](https://www.drlinder.com/wp-content/uploads/2016/12/post-weight-loss-patient-09b.jpeg)
Post Bariatric Weight Loss Patient 09B
![Post Bariatric Weight Loss Surgery Patient Before & After Photo 1](https://www.drlinder.com/wp-content/uploads/2016/12/post-weight-loss-patient-010a.jpeg)
Post Bariatric Weight Loss Patient 10A
![Post Bariatric Weight Loss Surgery Patient Before & After Photo 1](https://www.drlinder.com/wp-content/uploads/2016/12/post-weight-loss-patient-010b.jpeg)
Post Bariatric Weight Loss Patient 10B
![Post Bariatric Weight Loss Surgery Patient Before & After Photo 1](https://www.drlinder.com/wp-content/uploads/2016/12/post-weight-loss-patient-011.jpeg)
Post Bariatric Weight Loss Patient 11
![Post Bariatric Weight Loss Surgery Patient Before & After Photo 1](https://www.drlinder.com/wp-content/uploads/2016/12/post-weight-loss-patient-012a.jpeg)
Post Bariatric Weight Loss Patient 12A
![Post Bariatric Weight Loss Surgery Patient Before & After Photo 1](https://www.drlinder.com/wp-content/uploads/2016/12/post-weight-loss-patient-012b.jpeg)
Post Bariatric Weight Loss Patient 12B
![Post Bariatric Weight Loss Surgery Patient Before & After Photo 1](https://www.drlinder.com/wp-content/uploads/2016/12/post-weight-loss-patient-013a.jpeg)
Post Bariatric Weight Loss Patient 13A
![Post Bariatric Weight Loss Surgery Patient Before & After Photo 1](https://www.drlinder.com/wp-content/uploads/2016/12/post-weight-loss-patient-013b.jpeg)
Post Bariatric Weight Loss Patient 13B
![Post Bariatric Weight Loss Surgery Patient Before & After Photo 1](https://www.drlinder.com/wp-content/uploads/2016/12/post-weight-loss-patient-014.jpeg)
Post Bariatric Weight Loss Patient 14
![Post Bariatric Weight Loss Surgery Patient Before & After Photo 1](https://www.drlinder.com/wp-content/uploads/2016/12/post-weight-loss-patient-015.jpeg)
Post Bariatric Weight Loss Patient 15
Disclaimer: These photographs presented by Dr. Linder represent typical patient results, but not everyone who undergoes plastic surgery will achieve the same outcome.